Host static website like Hugo for free on Cloudflare Pages
 YC
YC- |
- 07 November 2022

Back in the day we use to host our personal websites on geocities or using some shared hosting. There are even some generous shared hosting where you get to host your site for free with full suite of features, but in return ur site will automatically display some banner ads. Else if you have some spare cash you can purchase shared hosting or if you are willing to fork out a large amount of cash, there is even private vps hosting. Those were the days where we use the CPanel file manager to upload our files or through some ftp client via drag and drop.
Over the years technology moved so quickly. We see the rise of affordable cloud computing where it makes private VPS or shared hosting less desirable. AWS and GCP revolutionized the industry as cloud computing gains traction. This leads to the adoption of technology like serverless computing and object storage which pave way for static website to shine. Jamstack, which is a web development approach where it decouples the web layer from the data and business layer, was popularized and many static site generators (SSG) such as Hugo were created.
SSG are programs that uses input text files and a set of templates to generated websites. Generated websites are static which means it does not need a backend. As such it can be easily served on CDN directly and does not need a running server reducing cost. Without server or backend, one does not have to worry about maintenance and updates of the server as this is managed directly by the CDN. This also reduce the vector of security attack as there is no actual server except for the ones managed by your CDN which you would already have them serve your static assets like css,javascript & image files.
Content
Cloudflare Pages
In late 2020, Cloudflare announced Cloudflare Pages. As described by Cloudflare,
Cloudflare Pages is a JAMstack platform for frontend developers to collaborate and deploy websites.
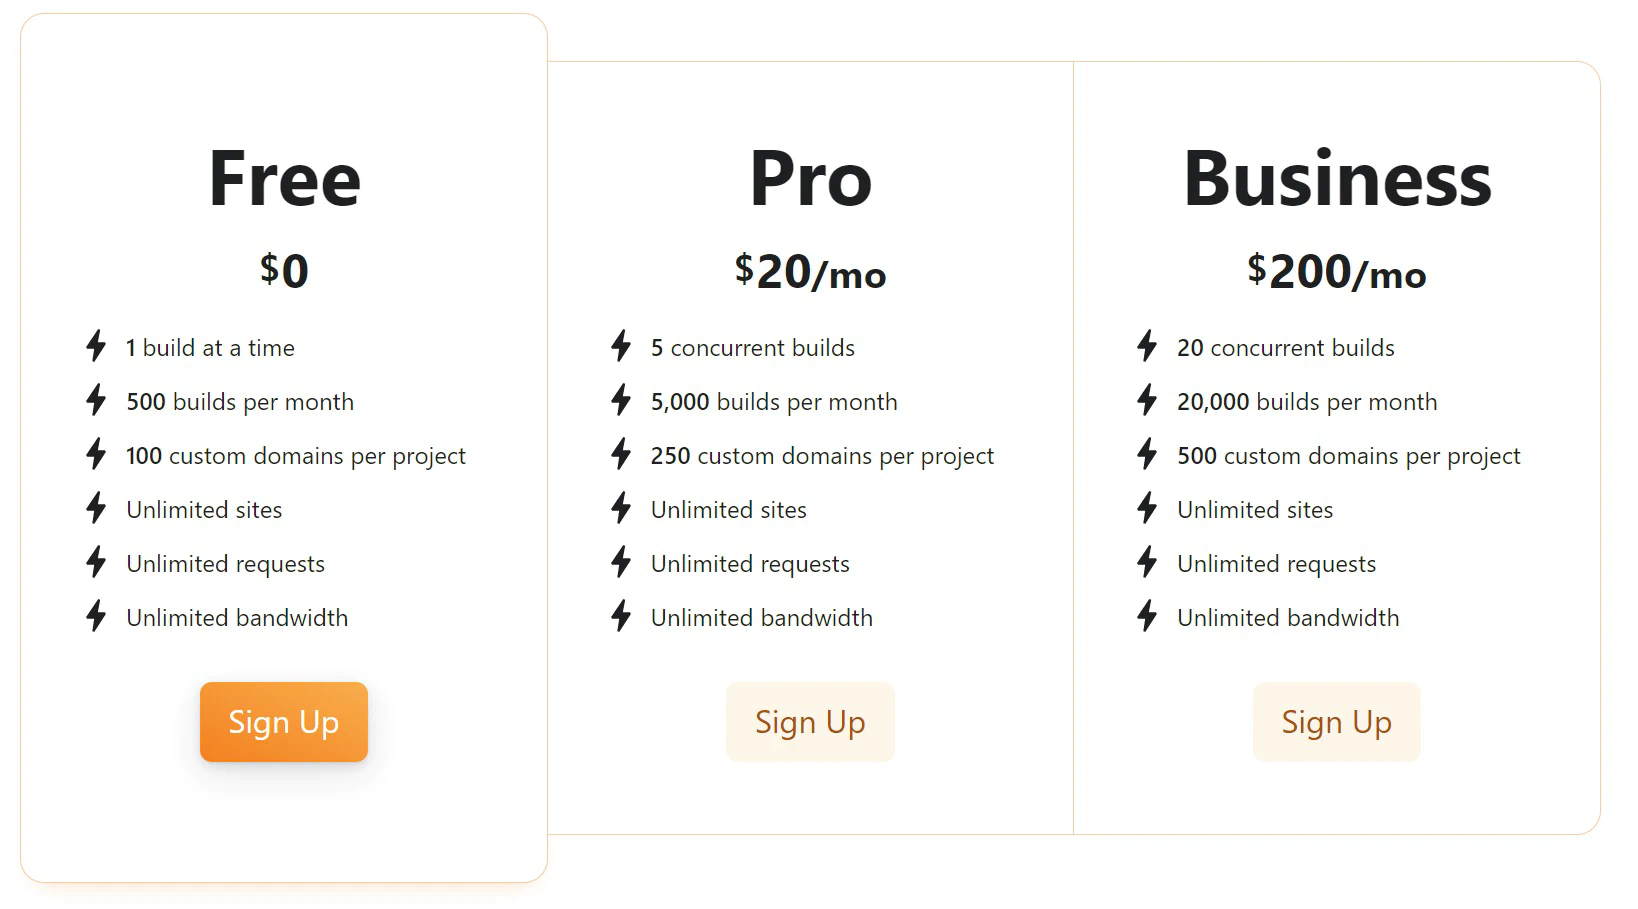
Cloudflare Pages serve your static website using their CDN technology on their edge. It provides features including running builds and supporting multiple collaborators. The best of all is that as of writing, Cloudflare provides a generous free plan with unlimited sites, bandwidth and request!
In this guide we will show you how to take advantage of Cloudflare Pages to host your website. Cloudflare Pages support a variety of SSG such as Hugo, Jekyll, Next.js and also non SSG static sites. For simplicity sake we will use Hugo as the SSG to generate your website and Github to house your source code.
Setup your Hugo repo on Github
In this guide we will assume you have your Hugo project ready. You can follow this quick start guide by Hugo to create your new Hugo project.
Create a new Github project by going to repo.new. Git push your Hugo source code to the new repository and once that is done, proceed to the next step.
Create a new project in Cloudflare Pages
- Login to the Cloudflare Dashboard.
- Click on Pages on the left sidebar.
- Click on Create a project and then Connect to Git
You will be ask to connect your Cloudflare Pages with either Github or Gitlab
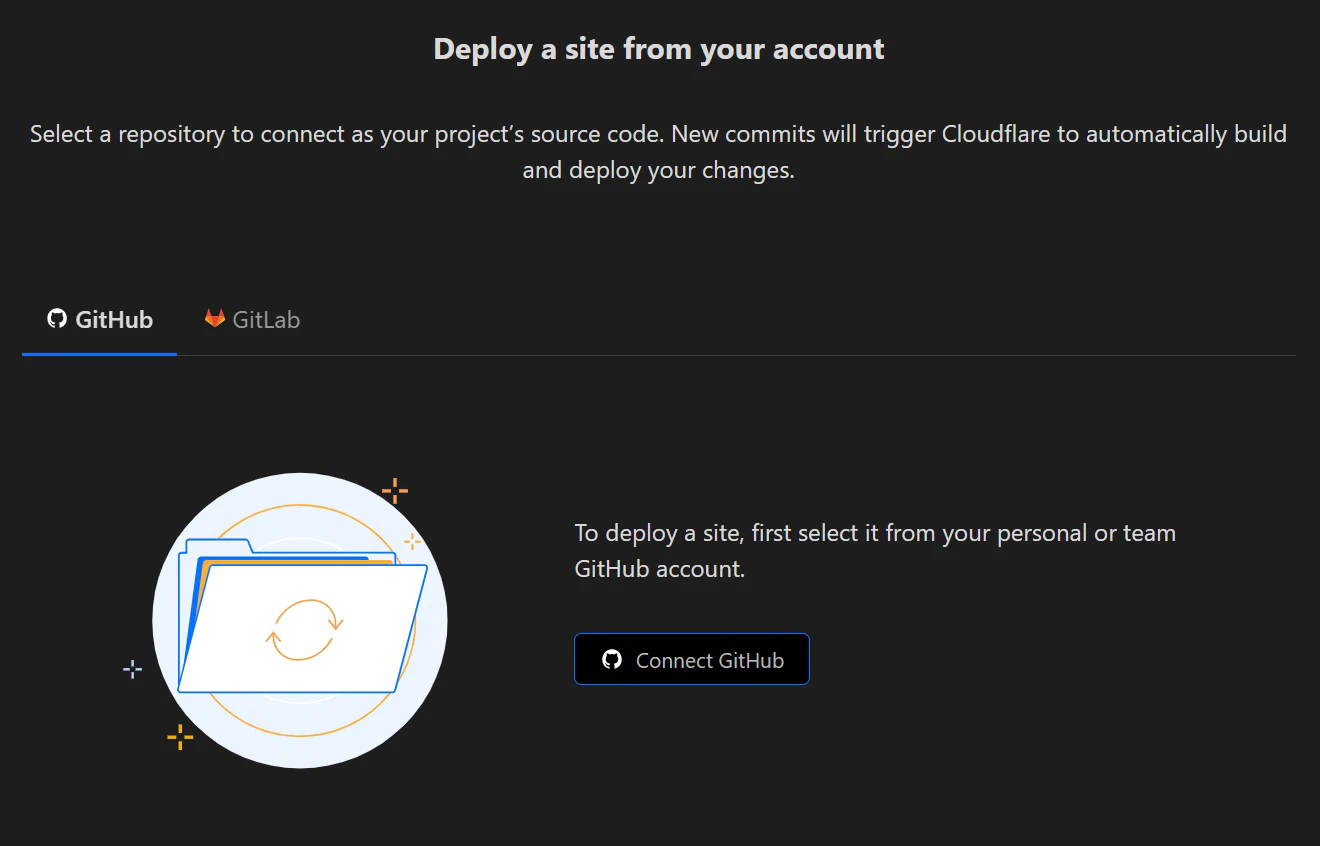
Click on the Connect Github button. You will be ask to install & authorize Cloudflare Pages. I strongly recommend to choose to restrict access to only selected repository. This is possible with Github, but as of writing Gitlab does not allow the granular access control and have to allow Cloudflare Pages access too all your repositories.
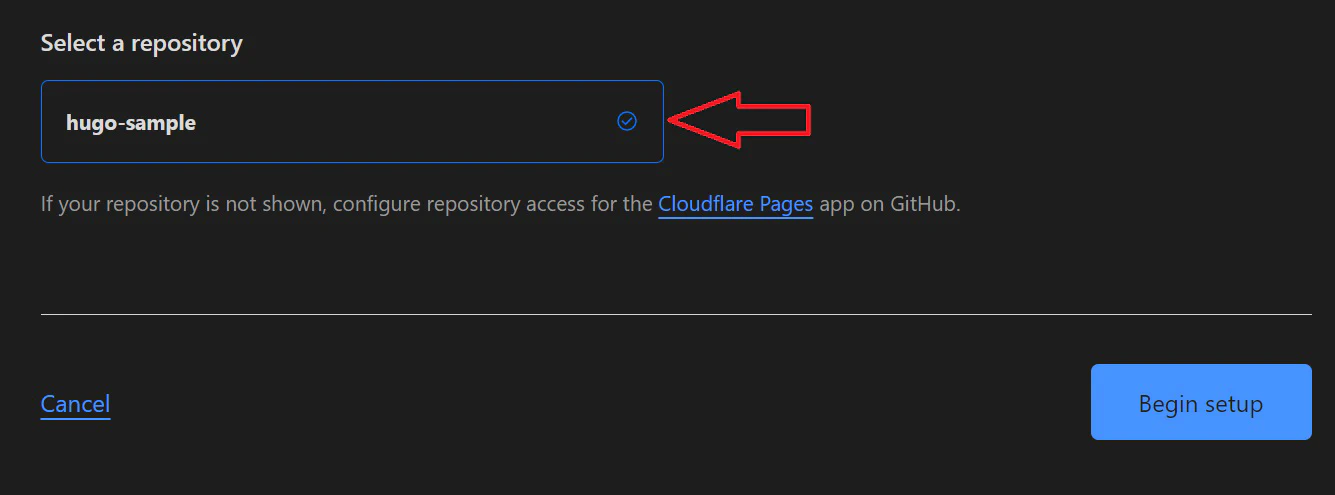
Once done selecting the repository we created in the previous step, click Install & Authorize. You will be redirect back to Cloudflare Pages dashboard.
Next select your repository & Begin setup
Fill in the Build Settings
Next you will be presented with a page where it list the project details and its build settings. Let’s go ahead and fill them up as describe below
| Option | Value | Description |
|---|---|---|
| Production branch | main | This define the branch to use as its source code for production |
| Framework preset | Hugo | Select Hugo from dropdown list |
| Build command | hugo --baseURL $CF_PAGES_URL | This is the command to build your website |
| Build output directory | public | By default Hugo output your website to this folder |
| Root directory (advanced) | Use this if your build command should be run in other directory. Leave this empty. | |
| Environment variables (advanced) | This is useful if you want to pass env vars to your build script. We will use this to control the Node.js & Hugo version | |
NODE_VERSION | 16.13.1 | Set Node.js version |
HUGO_VERSION | 0.94.2 | Set the Hugo version |
Once filled, click on Save and Deploy
Building and deploying
On your next screen, you will see that Cloudflare is building your website with the build settings you have just configured. If your site is successfully built and deployed, you will see some successful messages similar to the below:
21:45:31.248	Executing user command: hugo --baseURL $CF_PAGES_URL
21:45:31.324	Start building sites …
21:45:31.325	hugo v0.94.2-48FB9E4D+extended linux/amd64 BuildDate=2022-03-12T10:28:42Z VendorInfo=gohugoio
21:45:31.478
21:45:31.478	                   | EN
21:45:31.478	-------------------+-----
21:45:31.479	  Pages            |  7
21:45:31.479	  Paginator pages  |  0
21:45:31.479	  Non-page files   |  0
21:45:31.479	  Static files     |  1
21:45:31.479	  Processed images |  0
21:45:31.479	  Aliases          |  0
21:45:31.479	  Sitemaps         |  1
21:45:31.481	  Cleaned          |  0
21:45:31.481
21:45:31.481	Total in 193 ms
21:45:31.488	Finished
21:45:31.489	Note: No functions dir at /functions found. Skipping.
21:45:31.489	Validating asset output directory
21:45:32.340	Deploying your site to Cloudflare's global network...
21:45:38.331	Success: Assets published!
21:45:38.784	Success: Your site was deployed!
After that click Continue to project. You should see the successful build and deploy to production.

Cloudflare provides you with a free subdomain for your website under the domain .pages.dev. It is displayed at the Domains field, and clicking on the link brings you to your newly deployed site.
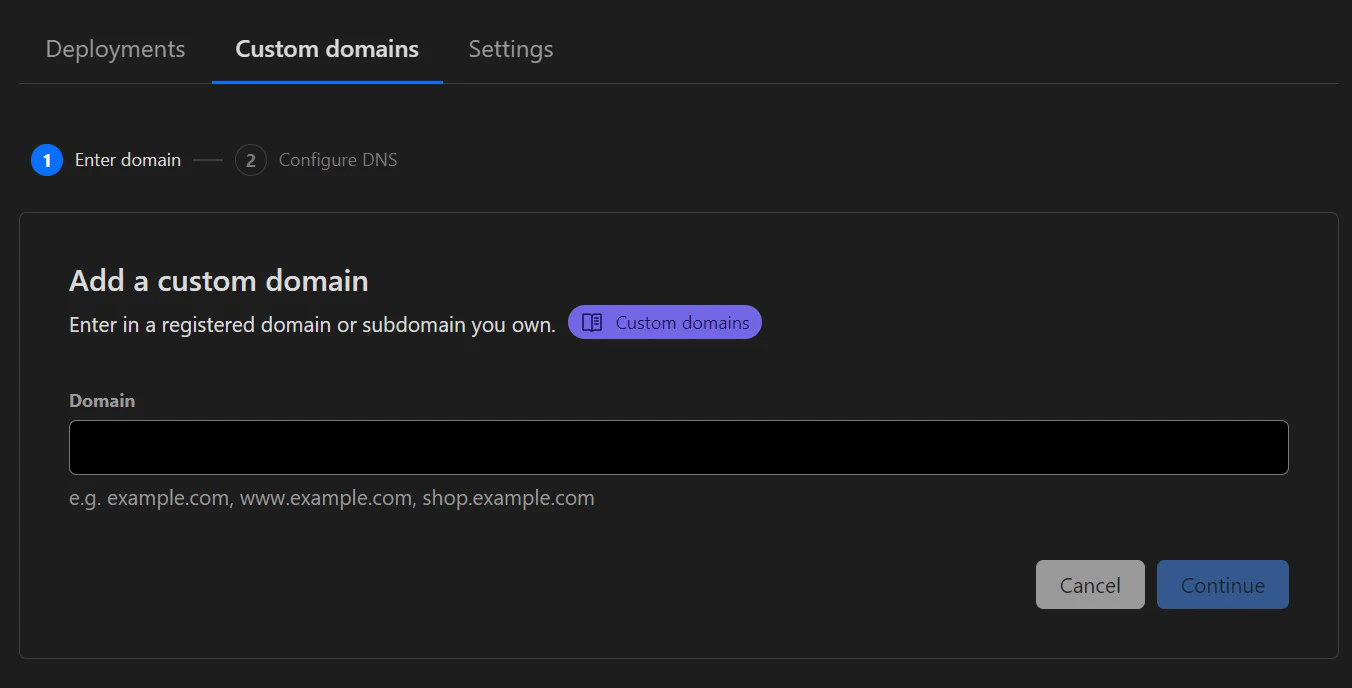
Cloudflare also provides you the option to add a custom domain to your pages. Click on the Custom domains tab and follow the instructions.
Congratulations you have successfully hosted your site for free! I will write more about tips & tricks with hosting your SSG with Cloudflare Pages in the future, including using Wrangler to upload your website so you have more control over your CI/CD pipeline.

Written By
YC
I oversee a group of developers based in Singapore, where I professionally write code in Golang. My expertise lies in crafting highly efficient and scalable backend systems.
You May Also Like

-
YC
- 01 Sep, 2024
When a Golang nil error is not nil
Coding in Golang are usually fun and easy for developers that are new to the language. There are sometimes gotcha which will catch out even experience …
Read Article
-
YC
- 29 Jan, 2024
Crash Course on Golang Benchmarks: A Beginner's Perspective
Golang, renowned for its simplicity and efficiency, employs benchmark testing as a fundamental tool for performance evaluation. In this exploration, …
Read Article