Migrate Free Legacy G Suite and Use Gmail with Custom Domain
 YC
YC- |
- 15 February 2022
Using custom domain for your email address provides branding and professionalism. However there are very few services out there providing email with custom domain for free. More than a decade ago, Google Apps for Your Domain (now known as G Suite legacy free edition) is a very decent free option. You can register a domain name and assign every of your family members an email address under this domain name. Every user receive the full suite of Google features that are available for any free google account includes using Gmail with your own custom domain.
On December 6, 2012, Google decides to stop offering the free edition to new customers. Good news is existing customers gets to keep the plan at no additional cost, until almost a decade later. In 2022, Google announce to sunset G Suite legacy free edition by July 2022. This left many users stranded, with the possibility of losing their email address they having been using for a good potion of their life. This poses great inconvenience to accounts and services registered with these email address, especially small businesses who rely on the same email address to grow their business for many years.
Fortunately there are still alternatives to use Gmail with your own domain name for free. In this guide we will show you how to migrate from free legacy G Suite and send/receive email on your professional email without leaving the Gmail interface. We will be using Cloudflare for inbound emails and MailerSend for outbound emails.
Content
Create a free regular Gmail account
Create a free Gmail account ([email protected]). If you already have an existing Gmail account and would like to receive emails from your custom domain email address in this existing Gmail account, you can use this Gmail account.
Create a free Cloudflare account
Sign up for a new Cloudflare account. In order to use the Cloudflare Email Routing feature to route your inbound email to your Gmail account, you need to add your domain to Cloudflare. However this means that you need to point your domain nameserver to Cloudflare and your domain DNS will be managed by Cloudflare.
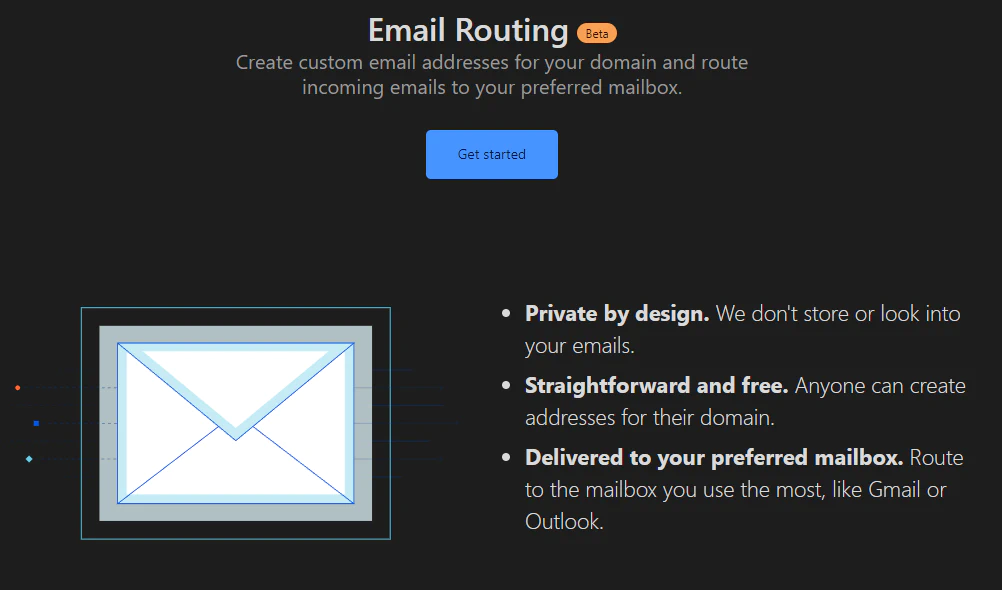
Get started with Cloudflare Email Routing Beta
Cloudflare Email Routing is a free feature that allows you to create any number of custom email addresses you want on top of the domains you already have with Cloudflare and automatically forward the incoming traffic to any destination inboxes you wish.
The service has recently been moved to open beta, which means you no longer need to wait for acceptance into its beta program.
Use Cloudflare Email Routing to forward emails to the Gmail account
After being accepted into the beta program, we will be welcome with a view when you click on “Email (Beta)” in the left navigation panel. We will be presented with a three-step configuration wizard.
First step involves entering your existing professional email under “Custom address” and your Gmail address under “Destination address”.
After we click “Create and continue”, a verification email will be send to your Gmail address so Cloudflare can prove that the address belongs to you. Open up your Gmail inbox and click on the verification link provided in the email.
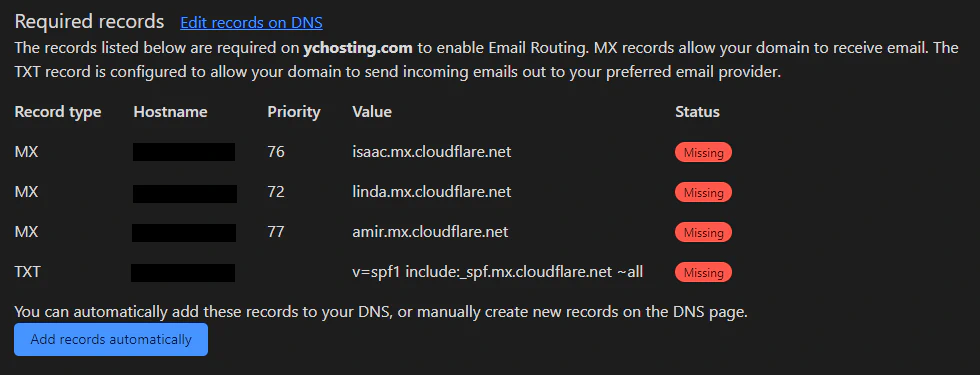
On the last step, we need to configure your domain MX and SPF DNS records. Go through every MX record manually and remove them. Also look for the SPF record belonging to Gmail and delete it. I would suggest to do a backup by copying the MX & SPF records that are deleted and save it somewhere safe.
Next Cloudflare will attempt to add the required DNS record for email routing automatically for you when you click on “Add records automatically”.
Test if your email routing are configured correctly by sending an email using your personal email to your professional email.
Cloudflare has also written a blog on migrating from Gmail here: https://blog.cloudflare.com/migrating-to-cloudflare-email-routing/
Use MailerSend for sending outbound emails
MailerSend is a service that provides a comprehensive tool for emails. It has competitive pricing and a free tier. To send email from Gmail, we will make use of MailerSend as our SMTP server. First register for a MailerSend account. Enter the relevant details, add your domain follow the instructions.
MailerSend will need to verify your domain. Since we are using Cloudflare to manage our DNS, the instructions to add the DNS record on domain verification will have to be done on Cloudflare dashboard under the “DNS” tab.
Adding SPF record
- On the DNS tab of Cloudflare dashboard, look for this TXT record
v=spf1 include:_spf.mx.cloudflare.net ~all - click edit and replace its content with the following value as specify by the instruction.
v=spf1 include:_spf.mx.cloudflare.net ~all include:_spf.mailersend.net
Add DKIM record
Follow the instruction on MailerSend to add your DKIM record. To add a DKIM record on Cloudflare,
- Click on “Add record”.
- Under “Type”, select
TXT. - Under “Name, add the record name given by MailerSend. (e.g. the value is usually in this format
mlsend._domainkey.yourdomain.com) - Add the value into the “Content” field. The content consist of a key that is unique to your domain.
RETURN-PATH record
- Click on “Add record”
- Under “Type”, select “CNAME”
- Under “Name”, enter the given CNAME value by MailerSend. You may edit this name as you wish, but keep them in sync with MailerSend & Cloudflare
- Under “Target”, enter the record value. It is usually
mailersend.net
Custom DNS for tracking
This is optional and it is use as analytics if you want to track your outbound email. Follow the instruction if you wish to enable this feature.
Click on “Check now” to initiate domain verification. Once your domain has been verified and your account has been approved, we can proceed with the next step of hooking up MailerSend with Gmail.
A free MailerSend account allows you to send up to 100 emails per month. Upgrade to a free plan by adding a credit card to send up to 12,000 emails per month! You will only be charged if you send more than 12,000 emails per month, and additional usage are reasonably priced. Upgrade to a premium plan to enjoy full suite of transactional email features at competitive pricing.
Allow Gmail to send email using MailerSend SMTP
To send email as your professional email address, we have to configure Gmail to send these outgoing email using MailerSend SMTP server.
- Login to your Gmail inbox.
- Click on the settings icon in your top right navigation and click on “See all settings”.
- Select the “Accounts and Import” tab.
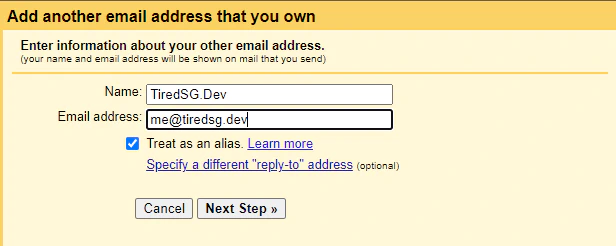
- Under “Send mail as” section, click on “Add another email address”.
You will be presented with a pop up window. Enter your name which you wish to be shown to your recipient under “Name”. Fill in your professional email under “Email address”. Leave “Treat as an alias” as enabled. Once done, click on “Next Step”.
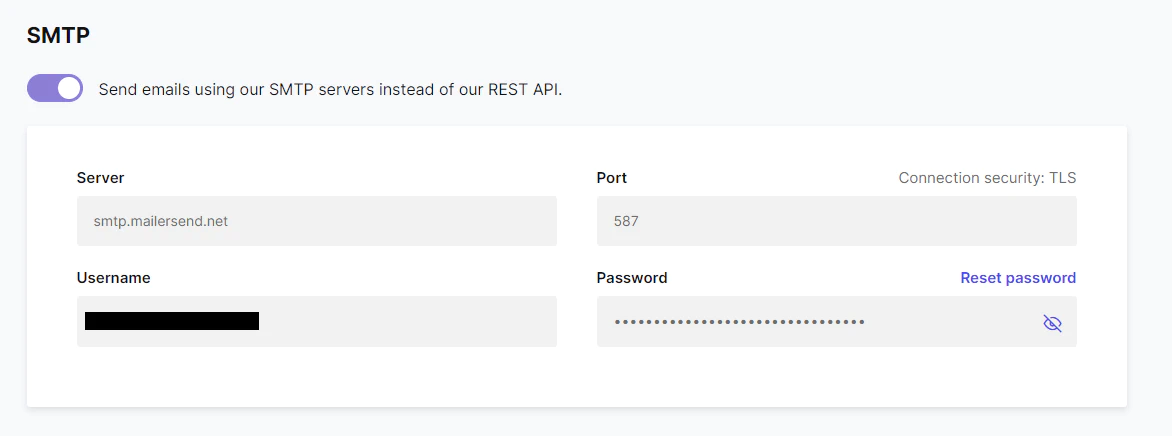
Next fill up the details of the SMTP server and credentials.
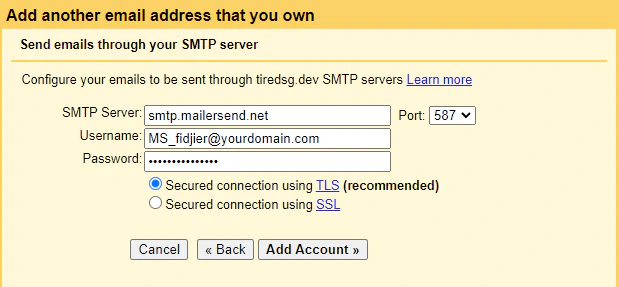
You can retrieve the information in your MailerSend dashboard.
- In your MailerSend dashboard, click on “Domains”.
- Under the domain of your professional email, click on “Manage”
- Scroll down to the SMTP section and the required details can be found here.
After completing the form, Gmail will send a verification email to your professional email. We will receive the email in your Gmail inbox as we have previously configured to forward the email from Cloudflare to your Gmail. Click on the verification link and you can now send email from Gmail as your professional email address.
Now go back to your same Gmail settings window and under the same section “Send mail as”, look for your professional email address. Click on the corresponding “make default”. Now when you compose any email using Gmail, by default Gmail will auto populate the “Form” field with your professional email address.
Finished!
Congratulations! You have successfully setup your professional email for free with the usability of Gmail.

Written By
YC
I oversee a group of developers based in Singapore, where I professionally write code in Golang. My expertise lies in crafting highly efficient and scalable backend systems.
You May Also Like

-
YC
- 01 Sep, 2024
When a Golang nil error is not nil
Coding in Golang are usually fun and easy for developers that are new to the language. There are sometimes gotcha which will catch out even experience …
Read Article
-
YC
- 29 Jan, 2024
Crash Course on Golang Benchmarks: A Beginner's Perspective
Golang, renowned for its simplicity and efficiency, employs benchmark testing as a fundamental tool for performance evaluation. In this exploration, …
Read Article